
How to Cut a Mat for Framing
Categories: Matting
If you’re wondering how to cut a mat for framing, look no further. You have an incredible picture you either took or had taken or maybe you have a wonderful piece of artwork and now you are looking for the best way to showcase it. The first thing you go to is the picture frame, and that’s perfect but why not spruce it up a bit and give your perfect picture a much nicer presentation?
 A picture mat or artwork matting is typically used to enhance the item being framed, think of it as an added decorative touch to your picture or artwork. When picking a color you typically will choose a color that will accent the piece being matted and framed and a color that will allow your piece to really…pop!
Besides the decorative aspect mats are also used as a form of protection for the piece, by having a mat you will have a separation between the artwork or picture and the glass of the frame. This is a key step because any condensation that may develop on the inside of the glass can be transferred to the artwork, leading to damage to the piece, mold and even mildew. Matting a piece of work doesn’t just look great it really ensures your work is kept safe for years to come.
To cut a mat for framing on your own work at home is quite simple to do, go to your local craft store or custom framing shop and choose your color of matting. You will also need an X-acto knife or shapr box cutter, a straight edge ruler, pencil, safe place to cut on, and your frame.
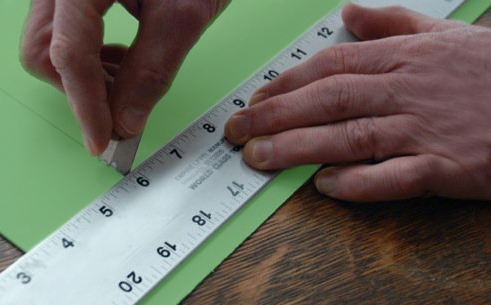
Cut a Mat for Framing Steps
Step 1: Clean your work area and then measure out a section of matting in the size of your frame, instead of trying to use the glass or the frame, take the cardboard backing that typically comes with frames and use that as your template to work with.
Step 2: Measure out the area that your artwork will go. According to a DIY site you should lay your artwork down dead center of your matting. Then figuring out the amount of space around it will be as easy as subtracting the width of the piece from that of the mat and simply divide by two. The only way this will work is if your piece is directly in the center though.
Step 3: Using your measurements draw the lines on the back of the mat board, these will be where you cut. Then cut your lines with your straight edge knife or cutter and be sure to take your time there is no going back once the first cut is made. Do this with all four lines, and your center should pop right out.
Step 4: center your piece in the opening and secure it in place, then place the entire thing in your frame, hang and enjoy.
If you have any doubts about your abilities to cut a mat for framing by yourself ,you can always visit your local custom framing shop where they can do this for you at a cost. Most shops will also be able to tell you which color matting would work best. Good luck.
Don’t forget to like us on our Facebook page or follow us on Twitter for even more tips like how to cut a mat for framing!