
How to Hang A Gallery Wall without Nails
Categories: Framing Tips
So, you want to hang a photo gallery on your wall but maybe you rent your home and can’t add nail holes to the walls that is why this article is for you. 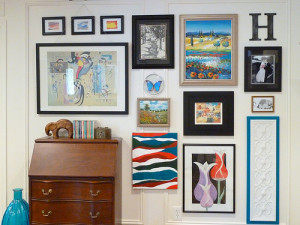 Today we want to show you how to create a gallery wall without nails. Now, you may be thinking to yourself “how on earth am I supposed to create a gallery wall with no nails?” Don’t worry we are happy to show you.
For this project you will need just a few items…
- A level
- A pencil with a good eraser
- Your photo frames
- 3m command strips, preferably the picture hanging strips
Now, you are probably thinking that those command strips are junk, right? They don’t stick for long and if they do they will tear the paint or wallpaper off your wall when you try to remove the adhesive. Both of these assumptions are misleading and incorrect, allow us to shed some light on the 3m Command Strips and how they can help you create a beautiful gallery wall without nails.
Steps to How to Hang a Gallery Wall without Nails
Step #1: Use your pencil and level to draw the layout for your gallery wall. You will want this layout to be drawn lightly so when you erase it there will be no residue of pencil left behind. This helps give you a visual of how your gallery wall will look and will also help you determine where each frame should go. You could also trace your frames instead of using the level to complete this step. 
Step #2: Place your pictures into your frames and decide where each frame will go in the layout (if you haven’t already done this in step 1 with the design layout). Then you will need to place two of your command strips on the frame. We recommend placing a command strip on the top and the bottom (directly in the center of the frame) to ensure a strong hold.
Step #3: Hold the frame up to the wall to ensure you will still like to have this particular picture here, then remove the adhesive cover from the strip and firmly press your frame onto the wall. One nice thing about this technique is that if you should ever want to change your design on your gallery wall you can easily remove the command strips and have no holes or residue left behind to try and clean or cover.
Step #4: Use a small amount of isopropyl rubbing alcohol on a towel and wipe the area where your frame will go. This helps clean the area well and gives your command strip a clean place to adhere to. Give a few moments after wiping the area to allow it to dry completely before hanging your frames.
Step #5: Sit back and sip your favorite coffee while enjoying your perfect gallery wall you created without the use of nails.
We hope you enjoyed our tips for on how to hang a gallery wall without nails. We hope you find it useful in your home decor projects! Make sure you stop buy or Facebook page for all the latest updates in the custom framing world.